> ## Documentation Index
> Fetch the complete documentation index at: https://next.gentrace.ai/docs/llms.txt
> Use this file to discover all available pages before exploring further.
# SCIM
> Configure SCIM for automated user provisioning in Gentrace
# SCIM
Gentrace supports SCIM for user provisioning. We support any SCIM provider via a custom configuration, and test for Okta in particular.
Gentrace only supports SCIM for user provisioning. Group
provisioning is not supported, as Gentrace does not have a concepts
of groups yet.
## Setup
Generally, SCIM setup is quite simple.
After setting up SSO, navigate to [security settings](https://gentrace.ai/s/security) and create a SCIM key.
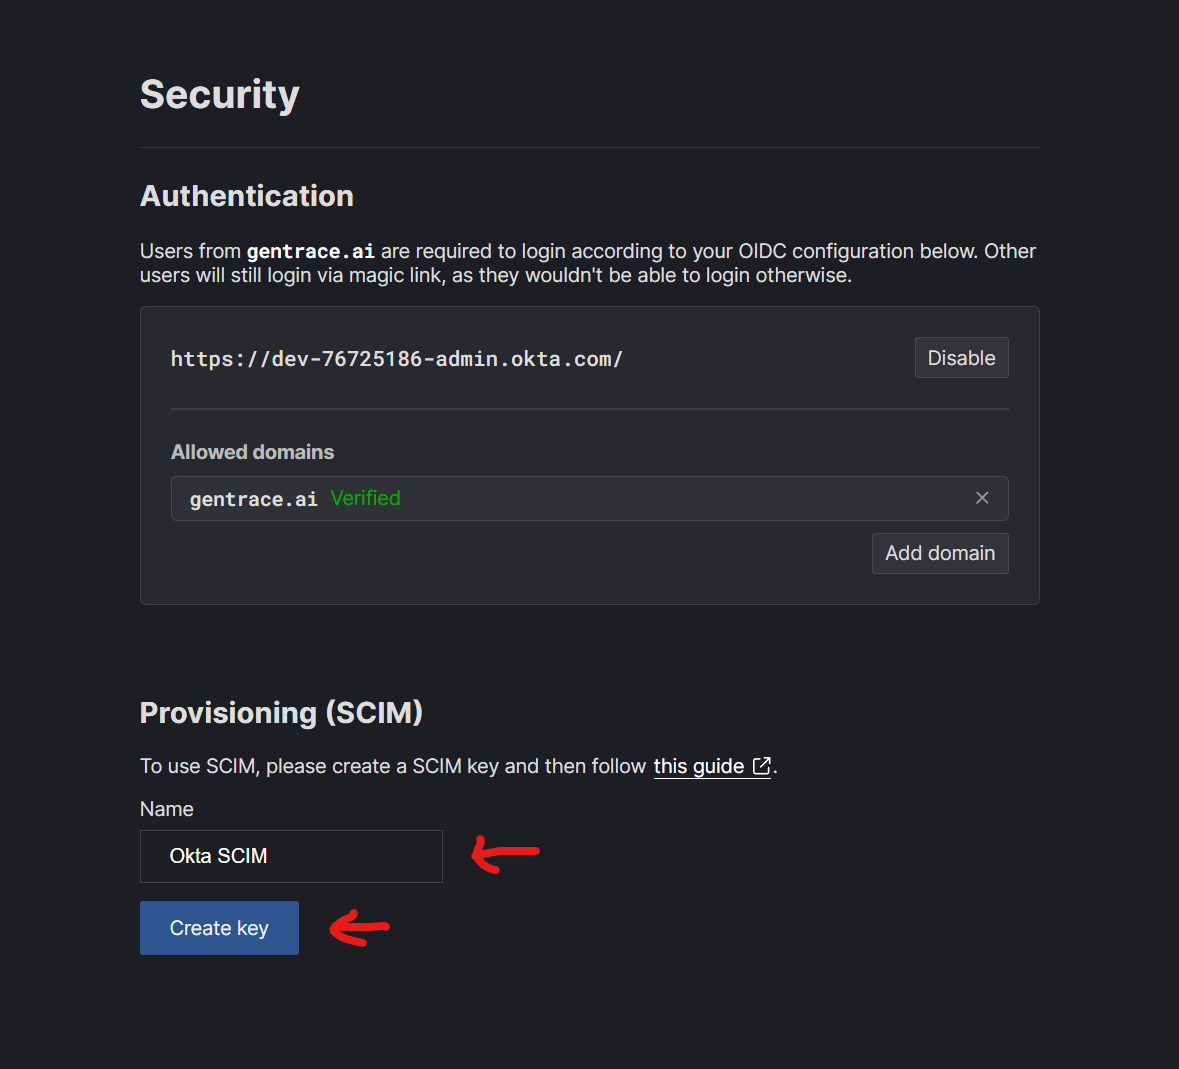 Then, use our SCIM server (base URL: [https://gentrace.ai/api/scim/v2](https://gentrace.ai/api/scim/v2)) and Bearer authentication with the SCIM key to provision users.
## Setup with Okta
Okta unfortunately does not allow OIDC and SCIM to be configured in the same application. You'll need to create two applications, one for OIDC and one for SCIM.
Learn more from Okta: [SCIM and OIDC in Okta](https://support.okta.com/help/s/article/configure-scim-for-a-custom-oidc-app?language=en_US)
### Step 1: Create SCIM key
After setting up SSO, navigate to [security settings](https://gentrace.ai/s/security) and create a SCIM key.
### Step 2: Create SAML application in Okta (SAML will not be used)
Create a new SAML application in Okta.
Then, use our SCIM server (base URL: [https://gentrace.ai/api/scim/v2](https://gentrace.ai/api/scim/v2)) and Bearer authentication with the SCIM key to provision users.
## Setup with Okta
Okta unfortunately does not allow OIDC and SCIM to be configured in the same application. You'll need to create two applications, one for OIDC and one for SCIM.
Learn more from Okta: [SCIM and OIDC in Okta](https://support.okta.com/help/s/article/configure-scim-for-a-custom-oidc-app?language=en_US)
### Step 1: Create SCIM key
After setting up SSO, navigate to [security settings](https://gentrace.ai/s/security) and create a SCIM key.
### Step 2: Create SAML application in Okta (SAML will not be used)
Create a new SAML application in Okta.
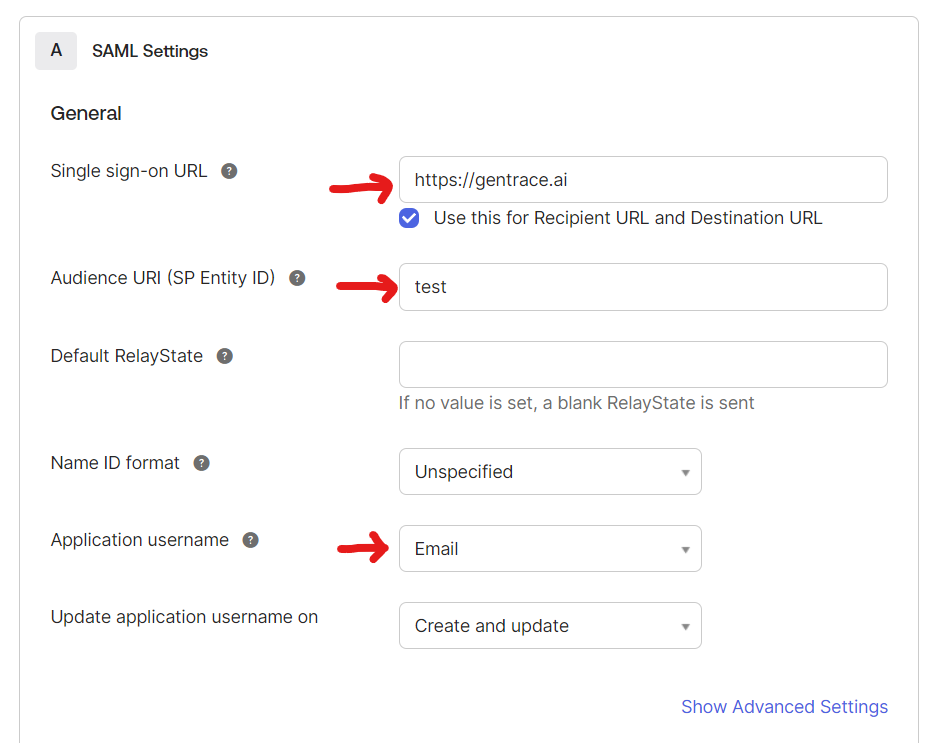
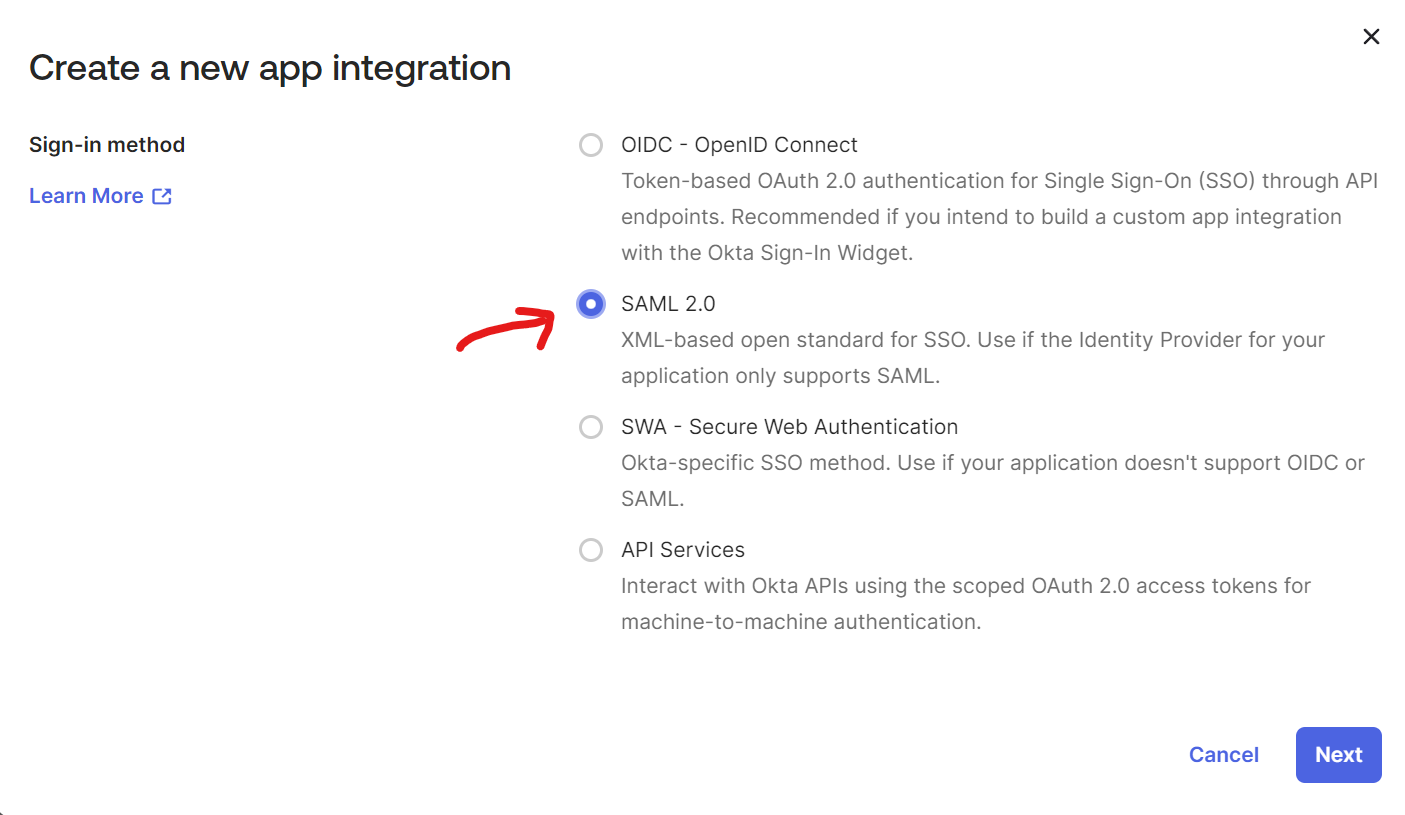 We won't actually use the SAML settings; this just allows us to get to SCIM setup.
The only setting that matters here is "Application username"
Fill in:
* Single sign-on URL: `https://gentrace.ai` (not used)
* Audience URI: `test` (not used)
* Application username: Email (actually matters)
We won't actually use the SAML settings; this just allows us to get to SCIM setup.
The only setting that matters here is "Application username"
Fill in:
* Single sign-on URL: `https://gentrace.ai` (not used)
* Audience URI: `test` (not used)
* Application username: Email (actually matters)
 Complete creation.
### Step 3: Enable and configure SCIM
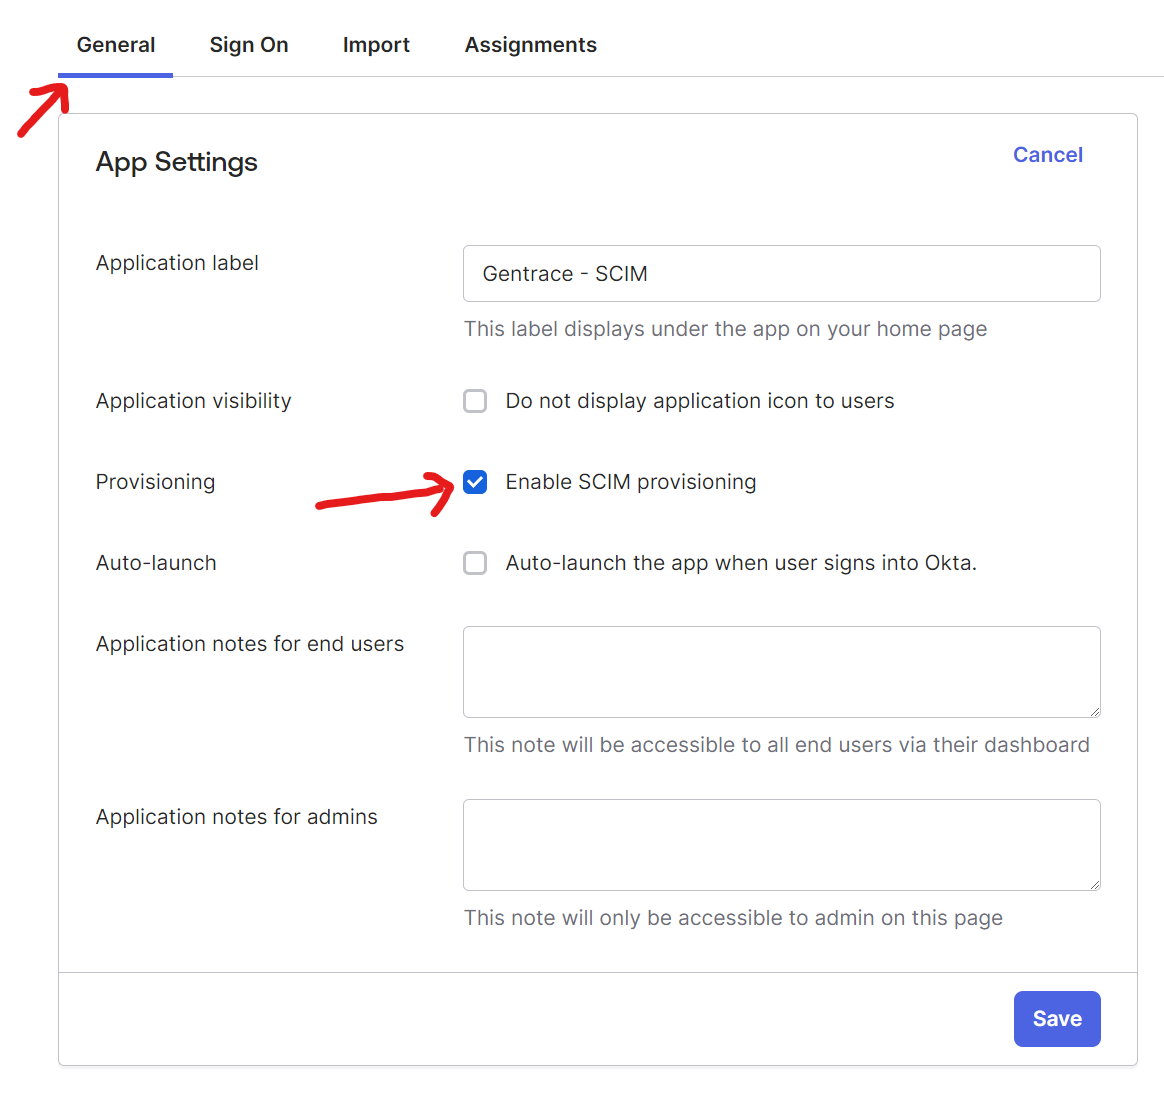
In your new Okta app, under "General," press "Edit" and then check the box for "Enable SCIM provisioning." Press "Save."
Complete creation.
### Step 3: Enable and configure SCIM
In your new Okta app, under "General," press "Edit" and then check the box for "Enable SCIM provisioning." Press "Save."
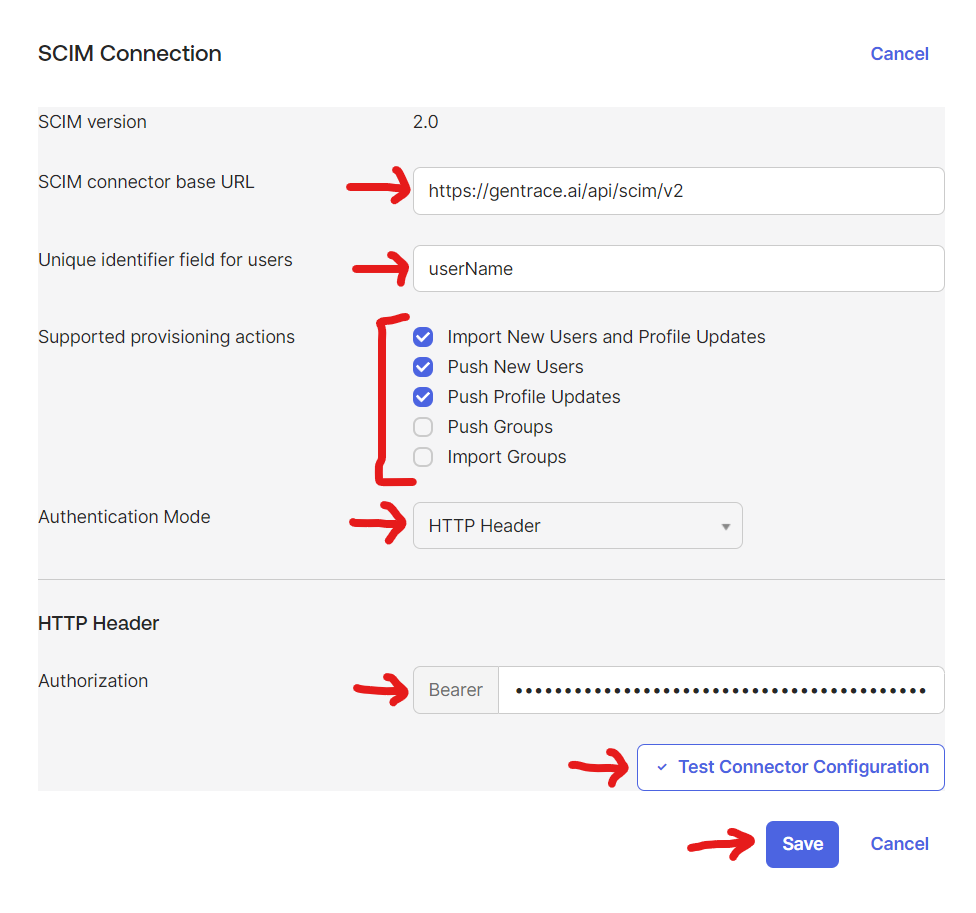
 Navigate to the new "Provisioning" tab and press "Edit."
Fill out the following:
* SCIM connector base URL: `https://gentrace.ai/api/scim/v2`
* Unique identifier field for user: `userName`
* Supported provisioning actions: Import New Users and Profile Updates, Push New Users, Push Profile Updates
* Authentication Mode: HTTP Header
* Authorization (Bearer): Use the SCIM key from Gentrace
Press "Test Connector Configuration" to validate that the configuration is correct.
Then, press "Save."
Navigate to the new "Provisioning" tab and press "Edit."
Fill out the following:
* SCIM connector base URL: `https://gentrace.ai/api/scim/v2`
* Unique identifier field for user: `userName`
* Supported provisioning actions: Import New Users and Profile Updates, Push New Users, Push Profile Updates
* Authentication Mode: HTTP Header
* Authorization (Bearer): Use the SCIM key from Gentrace
Press "Test Connector Configuration" to validate that the configuration is correct.
Then, press "Save."
 ### Step 4: Configure SCIM "To App" settings
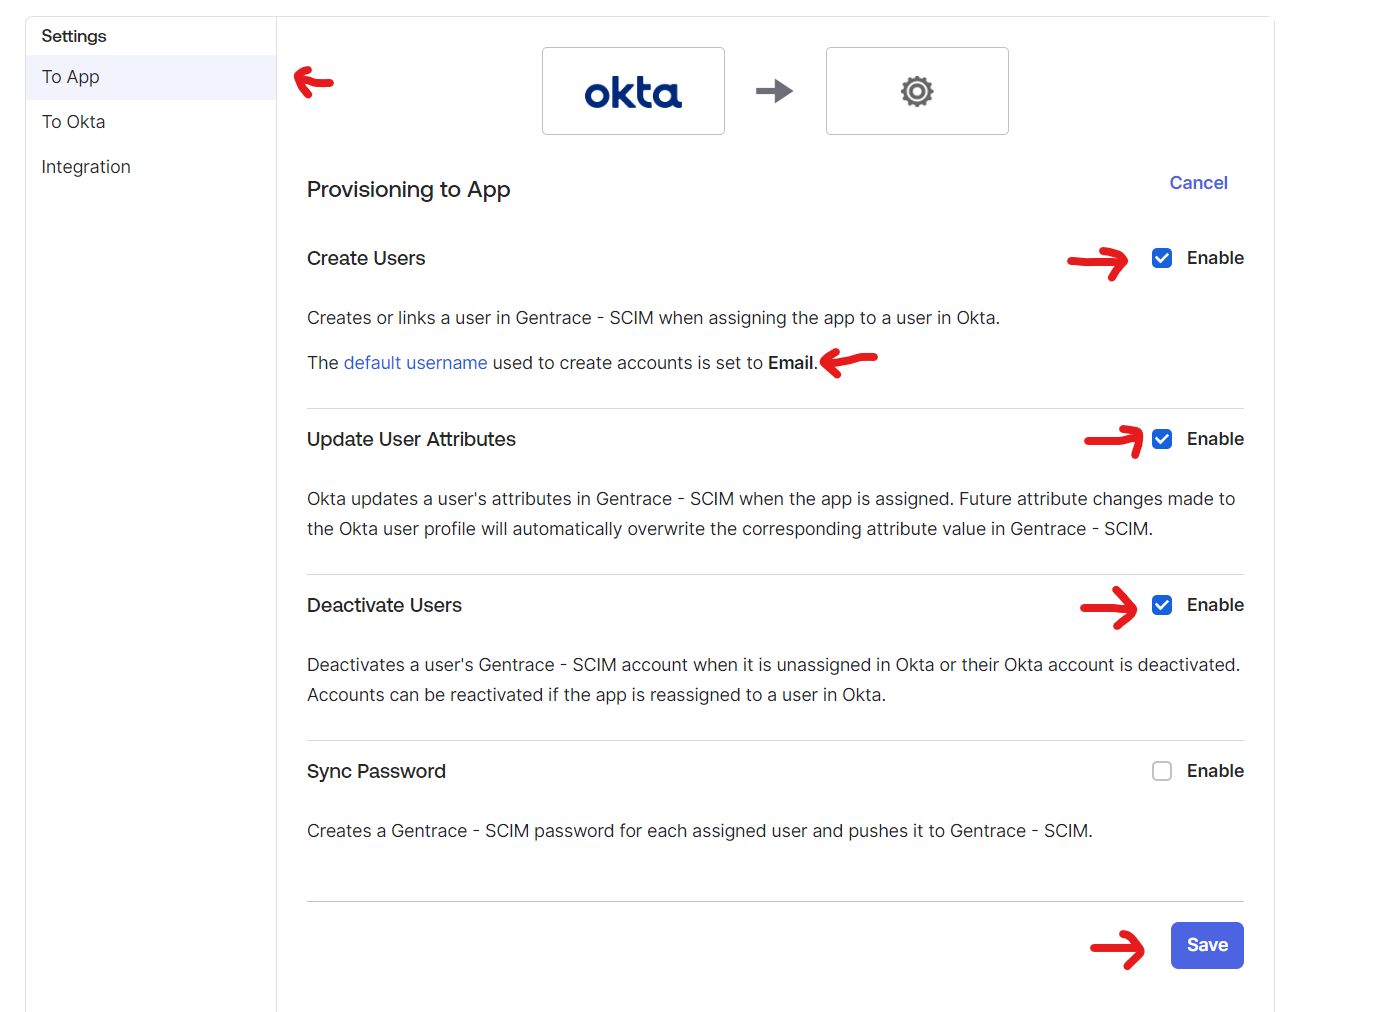
Under "To App", press "Edit", and change the following settings.
* Create Users: Enable, and ensure the "default username" is set to "Email."
* Update User Attributes: Enable.
* Deactivate Users: Enable.
* Sync Password: do not enable
### Step 4: Configure SCIM "To App" settings
Under "To App", press "Edit", and change the following settings.
* Create Users: Enable, and ensure the "default username" is set to "Email."
* Update User Attributes: Enable.
* Deactivate Users: Enable.
* Sync Password: do not enable
 ### Step 5: Add users to the app
You may now add and remove users from the application.
If you run into any issues, please get in touch at [support@gentrace.ai](mailto:support@gentrace.ai).
### Step 5: Add users to the app
You may now add and remove users from the application.
If you run into any issues, please get in touch at [support@gentrace.ai](mailto:support@gentrace.ai).